Install autotrace in 540kali2 amd64 DebianStretch
Datum
![]()
![]()
I am using now: 5.19.0-kali2-amd64 #1 SMP PREEMPT_DYNAMIC Debian 5.19.11-1kali2 (2022-10-10) ×86_64 GNU/Linux
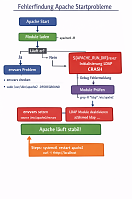
autotrace is a console program that can vectorize bitmaps. The special feature is on the one hand a complex autotrace-internal processing of the bitmap file and on the other hand the possibility to integrate the program into automated console program scripts without much effort.
Unfortunately, autotrace was not further developed and disappeared completely from the debian-based repositories since 2018. A self-compilation from the sources always failed. But now autotrace resources are available on Github – and they work on Debian Stretch derivatives.
I’m very happy about that, because my automated scripts to work „WEBSLAM“ rely on autotrace among other things. There may be more modern alternatives. For example, one can vectorize in the Inkscape program and possibly this can be done via console scripts. But effort and system load are incomparably higher and the output is not autotrace-like. One would have to „screw around“ a lot, if it is feasible at all.
The following is to be done:
First, create a folder for manually compiled programs. You can of course also include the program in the root area, perhaps under /opt, or /usr/local/. But I prefer to do this in my home directory under /home/your-account.
mkdir bin
Now you have to install all necessary packages from the repositories to resolve all dependencies. To do this, the Debian Multimedia Repository must be included in addition to the original Kali repository, because the original Kali resists anything that is not penetration testing. The creators don’t want to have to maintain all possible sources, that’s understandable. Open with a text editor, for example gedit, the sources.list
sudo gedit /etc/apt/sources.list
Enter your password, then the file will open in your text editor. Copy this line into the list, save the file and then run an update from your console .
deb http://www.deb-multimedia.org/ stretch main non-free
sudo apt-get update
Now load all dependencies from the repositories.
sudo apt install intltool imagemagick libmagickcore-dev pstoedit libpstoedit-dev autopoint git
This will occupy about 240 MB of your root partition, if you don’t already have some stuff installed anyway, such as imagemagick.
Now change via console to the new bin directory in your home directory
cd bin
Here you will now download the autotrace resources.
git clone https://github.com/autotrace/autotrace.git
Once this is done, use your console to change to the new autotrace folder.
cd autotrace
To create the configuration script customized to your system, simply type into your console the command
./autogen.sh
Make the program accessible system-wide with
LD_LIBRARY_PATH=/usr/local/lib ./configure —prefix=/usr
Now you can create the installation script with the command
make
Now something runs through it. If you get something like error or mistake at the end, you are out of luck. In previous versions under other distributions I tried to fix these errors, but it didn’t work. With the sources from Github it finally worked again, so I want to share it with you. If there are no errors, you can finally install autotrace with the command
sudo make install
After entering your password, the program will be installed. This is quite fast and you can try right away if it is responsive with the command
man autotrace
A manual of autotrace should appear in the console, which you can browse. By entering the letter ‚q‘ for quit you leave the manual section of man autotrace again.
Congratulations, you have done it. It goes without saying that you do all this at your own risk, I disclaim any liability and have only described here how it worked in my system.
The option „-error-threshold 0“ cannot be integrated anymore. It was used to display the rendered SVG file with its faces more closed. But now when I use it, I always get the message „segmentation fault“. I use the image formats from the Portable Bitmap Utilities, pbmplus. PNG does not converge for me.